
Hello! Hello!
The title really says it all! If you really did just score yourself a vintage Singer 66, congratulations, and welcome to your new addiction! (Now hold on. Give me a minute to let me fix myself up so no one can tell I was just doing the happy dance for you!)
I do like most of the old, iron, ornate machines that Singer put out; but the 66 is definitely special. As I’ve mentioned before, it was the first machine I ever used (after my ten-minute run with a new, plastic, made-in-China Singer that had me proclaiming that sewing and I were not right for each other) — and it’s still one of my favorites.
Time and time again, I see someone purchasing one of these babies as their first vintage machine. And, as they should, they decide that they’re not going to just use it for display; they’re going to actually use it to sew. At first, you’re nervous and fear you’ve bitten off more than you can chew.
Relax! Chances are, if you have one, it can be cleaned and oiled and used for many years to come. You can even pass it down to your kids. (My kids will get all seven, whether they like it or not! LOL) I promise, it’s not as intimidating as it looks.
Sew (I’m sorry, couldn’t resist!) let’s talk it out!
The two 66’s that we have in our collection are both “Red Eyes.” Not all Singer 66 models will have these decals, but it is a quite popular look. (You can find the other decal sets assigned to the old Singer 66’s here: http://ismacs.net/singer_sewing_machine_company/decals/domestic-decals.html) I’m warning you now, you may spend more time than you’d care to admit ogling the gorgeous decal sets used over the years!
We have models from 1910 and 1919, and both are identical (at least to my not super-observant eyes) to each other besides the fact that one is in the process of becoming a hand crank machine and the other is a treadle.
This post is not intended to be a full-blown manual by any stretch of the imagination. (Copy of full manual is available here: http://www.a1sewingmachine.com/manuals/66.pdf.) This is more of an oh-geez-I-just-got-this-machine-because-I-thought-it-was-pretty-and-now-I-think-I-want-to-get-it-up-and-running kind of visual walk-through. My hope is that it will get you a little more comfortable with your new machine in an upbeat, non-technical, user-friendly way.
I will tell you that, to this day, I do not own a manual for this machine. It was my everyday machine for five years (until that pesky Singer 15 got in the way!), and I had no trouble just tinkering with it and figuring it out – with a little help from Professor YouTube in the early days. (And because Matt may read this if he gets a case of serious boredom or the flu and has nothing else better to do, he helped me out when there was something I just couldn’t figure out — if that ever did happen! LOL)
First things first, let’s start with some nerdy sewing eye candy.
Behold, the 1919 Singer 66 “Red Eye”:

And some pictures with some labeling so that some terms used in this post make more sense down the line.


So when you get this machine from your real estate sale, garage sale, Craig’s list ad, grandmother’s hand-me-down, however you get it, the first thing you’ll want to do is oil it up and get thing moving smooth again. You can use this to put in all of the little oil ports on your machine. (It also doubles as an exterior machine cleaner as it gently cleans and sheens the gals!)
These machines were made to be maintained by the sewist, as you will see as we go on. No more dropping it off for repairs and service! You can do this all yourself!
Here’s a picture of –not all!- – some of the oil ports, so you know what they look like when you go oiling.

Arrows indicate oil port locations on the top of the 66. There are others near the bobbin winder, for instance, not shown in the photo. The good thing is, they are easy to spot when you look over your machine and practically spell out for you where you should put some oil. :O)
Basically a drop in each hole here and there will keep your vintage in tip-top shape. (Again, manual will probably tell you specific intervals. I just go with the flow and oil more when I use it more, oil less when I use it less. It has served me well. )

Now that you’ve got her oiled and ready, you may notice – and great chance you will – that you happened to get some extra bobbins and needles and other goodies. If you did; awesome!
If you didn’t, don’t fret. This machine is the easiest old machine to buy for, in my experience. It takes class 66 bobbins and regular sewing machine needles! Easy. So first you get your bobbins. (Please read reviews as it seems these don’t fit all 66’s equally. I have never had to buy them, as my original 66 came with a handful, and that was enough for me. Hopefully, you will have such luck, too!) You can also get bobbins here: https://www.facebook.com/pages/Stitches-in-Time-Sewing-Machines-Parts-Supplies/173087319370566, if you’d like.
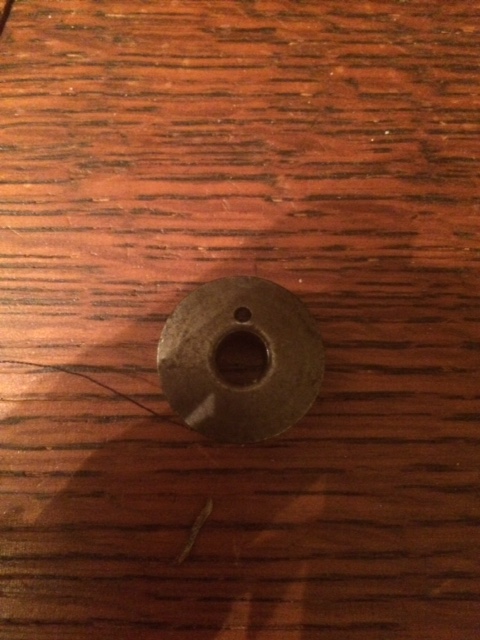
So here is your bobbin for the 66:
 First things first, you’ll need to wind your bobbin if it didn’t come full of thread.
Before we do that, let’s stop and get a look at the bobbin so that when I talk about loading it in the winder, it makes more sense.

This is how you will thread your machine to load the bobbin:

Head left around to the left side of your “hook” and come down and around your tension knob. Head right, towards your bobbin winder.
Now that you have thread set up to load your bobbin, you’ll need to start a bit of thread around your lower bobbin so that you can wind it. Usually, I just wrap thread around a few times to start. I don’t personally like to knot it, but some people do. I’m sure it’s fine either way.
And once you do that, here’s the bobbin winder you’ll be getting ready to use:

Once you have your bobbin all lined up, with the nipple hole on the nipple on the winder (shown above with the arrow pointing towards it) and snugly in place, pull some slack in the thread, and place it in the little “Y” piece (the bar that’s going to distribute your thread evenly over your bobbin). This “Y” piece is shown in the picture above. It stands vertical in the photo and is very near the arrow pointing to the bobbin winder nipple.
Now push down on the bobbin winder assembly to engage it in your treadle belt (if using a treadle). And treadle! Your bobbin should be winding and your little “Y” should be moving back and forth nice and evenly, distributing your thread to your bobbin. If it’s a little sluggish, there are two tiny oil holes that you can lube up there, too. :O)
When your bobbin is fully wound, it will make a clicking noise and stop loading – possibly even pop up into original position if it’s not being sassy.
You can remove your bobbin, snip the thread, and load it into your machine.
*Remember to have your thread running clockwise before you drop it into your machine. *
Leave a small tail (three inches is fine) of thread, and drop your bobbin into your machine. There is a small groove on the top/left of your bobbin, once it’s seated into your machine that you want to pull your thread under and over to the right.
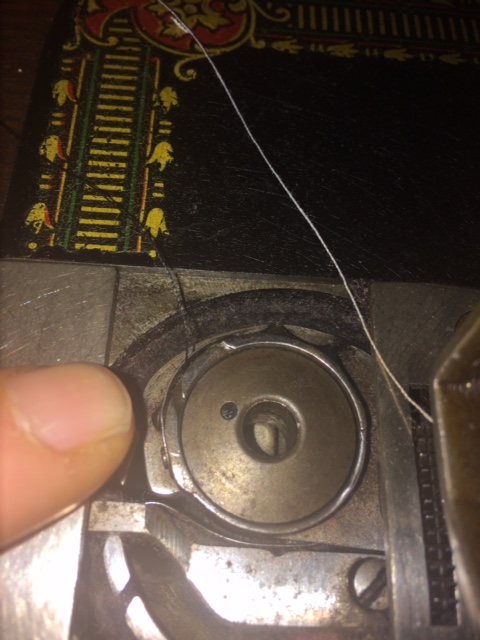
Once you get this into place, you can close your plate and let your thread tail hang through the hole, towards the back of your machine.

Now we can get to threading the needle!
Before I show you this, I want to say that I’m lazy, and, as mentioned before, have never consulted a manual to see if this is the proper way to thread a 66. I guess I like livin’ on the edge. Or something. It works for me, so I stay with it. I think, chances are, it will work for you, too!

So you’re going to come over to the left, over your hook. Then come down and around your tension knob and across to the other “hook” (if that’s what you call it?!). Go straight up and thread through the hole on the piece that goes up and down with the movement of your needle. (I’m really good with the technical names! Ha!) Come back down and thread through your guide on the face plate. Keep on coming down and thread to the right through your needle.
If your treadle belt is super stiff or rotten or to short, they are easily found here.
Now, quick, get that fabric and check out that pretty stitch!!!
But wait! I want to add a few helpful websites for new treadlers or VSM collectors to check out:
http://treadlelady.com/Treadlelady.com/Home.html
https://www.facebook.com/groups/VintageSewingMachines/
El fin.
All kidding aside, I genuinely hope this helps you feel a little more comfortable with your new VSM. Pass it on. Let me know if it helps. And please let me know if there’s something that’s missing that just shouldn’t be. (I’m a full-time scatter-brain, and this whole post was completed from 3:00 to 7:00 a.m. in the morning. Maybe not the best mix !)
And, boy, did that get technical for a non-technical approach. Next time I’m blogging about the color green and why I like it so much. Or the weather.
Time for me to hit the sack!
C
